There's no better way to welcome
your guests than a hot fondue
Fondues are rich and delicious meals
without a lot of preparation involved
Surprise your loved ones with great craft creations...
To dry flowers and foliage with silica gel it is necessary to pick them when they have just opened and in perfect shape. All plants going into the desiccant must be perfect, any flaws will be accentuated and look ugly.
It is imperative that the flowers be absolutely dry. If dew or some other moisture is on the petals at the time you cover the flower with silica gel, the silica gel will stick to the petals. In trying to remove the silica gel once the flower is dried, you may ruin the entire flower.
Silica gel requires no hit while drying, unlike other methods.
NOTE: It is very important to use airtight containers for drying with silica gel because it will readily absorb moisture from the air.
Unless the flowers are to be used for gluing, the flower steams should be trimmed to 1" to about 1½" (2,5cm to 3,8 cm).
It is advisable to wire the stems before placing them in the silica gel as they do tend to be more fragile afterwards. Wiring creates a strong stem of any length that can be inserted into a floral foam base and is much more flexible than natural stems.
The short, bent wire what you use before drying can be lather straightened and extended with a florist's wire (22 or 24 gauge) so the flower can safely be used in arrangements.
Since the flowers you will be drying will have retained varying amounts of water while growing, it is impossible to come up with a, specific formula of drying periods. Much depends, however, upon the type of flower you are drying, the size of the bloom, how much moisture it contains, and other variables.
Putting a Styrofoam layer in the bottom of the container (before you pour the layer of silica gel) is very handy for holding the wires of dried flowers, especially if you have large container and more flowers in same container.
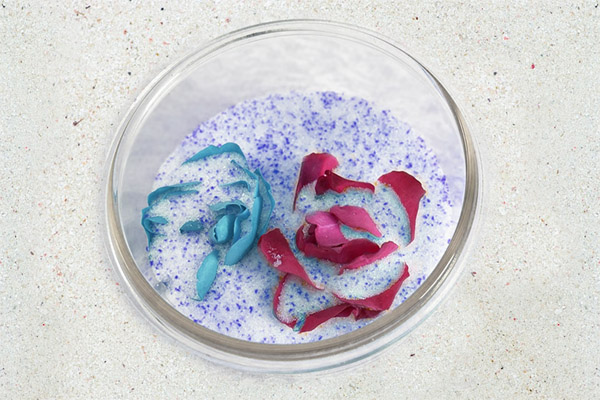
Pour into an adequately large airtight container an inch (2,5 cm) of dry silica gel on the bottom. If the container will hold six flowers with a 3-inch space between each, place a teaspoon of silica gel where each of the six flowers will be placed to dry. These little mounds of silica gel will support the flowers so that they will not dry flat. Place one flower, face down, over each mound. Using a tablespoon, spoon the silica gel against the side of the container, away from the flowers, so that it slides down the side of the container and under each petal of each flower without causing undue weight on the flower. Continue pouring the gel against the container's sides until the flowers are totally covered.
When placing several flowers in the same container for drying at the same time, be sure to separate them well, so that moisture does not seep from one flower to another. When the flowers are completely covered with silica gel, seal the airtight container with the lid and set it aside. Mark the date on the container to help you remember when to check for dryness.
To dry flowers that have many petals, such as marigolds and roses, place them in the silica gel face up. The plant material must be completely covered with the powder, but before you spoon on the powder, take a paint brush and gently coat the inside petals with the silica gel so that no area escapes. Using a tablespoon, spoon the silica gel against the side of the container, so that it slides down the side of the container and around each of the' flowers, bracing them so they do not fall over and letting the crystals seep between each layer of petals. When flowers are completely covered with silica gel, place the airtight lid on the container, mark the date on it, and set it aside.
When drying several flowers in the same container, it is also a good idea to make sure that they are the same type of flower, because on that way they will all be dry at the same time. But if, for instance, you don't have a same-type of flower in the same drying container, they will not be dry in the same period of time. The additional handling of the flowers while testing for dryness could cause breakage of the petals.
To test flowers for dryness, simply run your finger through the silica gel near the outer edge of the container, or even better use a utensil such as Popsicle stick, where you are sure of not "bumping" the flowers, or tilt the container.As the silica gel filters away from the flowers and the petal tips are exposed, gently feel them. They should feel crisp and papery dry. If they are still soft, recover them and let them stand a while longer. When you are sure the flowers are dry, gently pour the silica gel from the container until enough of the flowers are uncovered to allow you to pick them up by the stem.
When you remove the dried plant material, make sure none of the powder is clinging to the petals. Using a dry, clean paint brush gently brush the powder off the petals back into the container.
To store the dried flowers until you have enough of them to begin an arrangement or project, place them face up in an airtight container of dry builder's sand. You can dry sand in your owen too, just use the same method like for drying silica gel.
The container with dry sand should have about 2 inches of sand in it, just enough to cushion the flowers and hold them in an upright position.
Before reusing the silica gel, take time to heat it to make sure it is thoroughly dry. The warmed gel will also hasten the drying time of the flowers you are about to work with.
If you want to obtain a maximum number of dry flowers in a minimum amount of time, use drying method with preheated silica gel, because flowers dry faster in preheated silica gel.
Preheat the silica gel by placing it in an oven-proof dish and heating it, uncovered, at 250°F. in a conventional oven for ten to fifteen minutes.Remove silica gel from the oven and place one inch of the warm silica gel in the bottom of an airtight container.
All other instructions are same like for the drying with regular silica gel method except by doing that you will have a maximum number of dried flowers in a minimum amount of time. Learn more about Drying with Silica Gel...
Warning! Silica gel is not toxic, but remember never use silica gel containers or dishes for preparing food after you use them for drying flowers or for drying silica gel, because they often absorbs pesticides from plants as they dry.
 Drying Flowers in the Microwave Oven
Drying Flowers with Desiccants
Emmentaler or Emmental is a yellow, medium-hard cheese from Switzerland with characteristic large holes. It is sometimes known as Swiss cheese in North America, Australia and New Zealand, although Swiss cheese does not always imply Emmentaler.
This popular cheese has a piquant, but not really sharp taste.
Three types of bacteria are used in the production of Emmentaler: Streptococcus thermophilus, Lactobacillus, and Propionibacter shermani. In the late stage of cheese production, Propionibacter shermani consumes the lactic acid excreted by the other bacteria, and releases carbon dioxide gas, which slowly forms the bubbles that make holes.
The Emmentaler cheese originally comes from the Emme valley in the canton of Bern. Unlike some other cheese varieties, the denomination "Emmentaler" was not protected ("Emmentaler Switzerland" is, though). Hence, Emmentaler of other origin, especially from France and Bavaria, is widely available. Even Finland is an exporter of Emmentaler cheese.