

There's no better way to welcome
your guests than a hot fondue
Fondues are rich and delicious meals
without a lot of preparation involved
Surprise your loved ones with great craft creations...
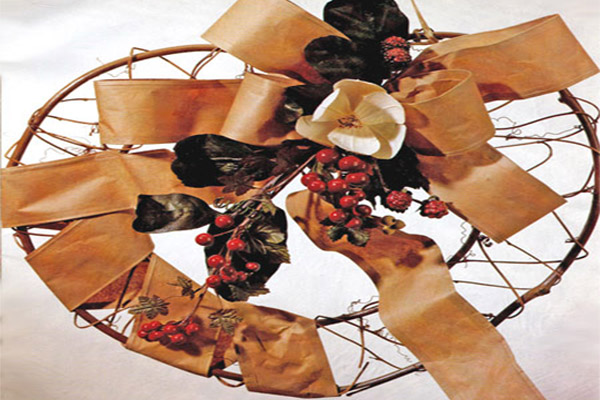
An interesting development in drying flowers is the use of a microwave oven. Because your object is to dry flowers as fast as possible in order to retain their natural color and form, the microwave oven can be a really 'magic tool'. A flower that might take five days to dry with the conventional silica gel method or three days to dry using preheated silica gel will dry in just one minute in the microwave. Drying flowers with such speed is really great advantage and with that method you will be able to accumulate an assortment of blooms for an arrangement in a relatively short time. Another advantage is that you will be able to dry many flowers while they are at the peak of their growing season. For example, if you dry a rose with the microwave method, you will know within few minutes if you have successfully preserved that rose. If for any reason you are not satisfied with your rose, you may immediately dry another rose, because you have time to do that.
When drying flowers in the microwave, it is best to use a cardboard box and place it on an upturned saucer to raise the box so the moisture can escape from its base. Select a box at least 2 inches taller than the flower you are drying. The best is if you dry only one flower at a time. One reason for this is that the less heat the flowers are subjected to, the better color will result. The more flowers placed in the microwave oven at the same time, the longer amount of time they will have to be in the oven. The increased amount of time could cause a severe color loss. Another advantage to drying a single flower at a time is that you will be able to correct the timing, if necessary, without losing more than one flower.
Place one inch of the warm silica gel in the bottom of the box. If you are drying flowers in the face down position, add a two teaspoons of silica gel in the center, forming a small mound. The mound will support the flower, allowing it to dry in a natural cup shape rather than flat. Slowly pour spoonfuls of gel against the sides of the cup, turning and tilting the cup as you pour. The silica gel will slide down the cup sides and under each petal without causing undue weight on the flower. Continue adding silica gel until the entire flower is covered, leaving at least 2 inches from the top of the silica gel to the top of the container, so none of the gel will pop out during drying.
It is good idea to take careful notes about your experiment so that you have the same success next time (or will know to avoid that particular pitfall!). For example if you test white rose and it become rather beige in color, your rose probably contained less moisture than normal, due to lack of rain, and thus will have to be dried at half the heat used. Timing can be cut more than once until you are pleased with the color. Continual experimentation is the secret to determining the exact length of time for drying flowers in the microwave oven, since even the same species can differ in moisture content on different days.
When the time is up, take your plant out of the microwave oven and let it stand for twenty to thirty minutes. At that point, check for crispness of the petal tips by gently pouring the silica gel from the box until the tips are exposed. If they feel papery dry, just continue pouring the gel from the cup until you can easily pick up the flower by the stem.
Another big advantage of drying flowers in the microwave oven is that you will not need to purchase a great deal of silica gel. When you are using regular method to dry with silica gel it is tied up for many days at a time, which prevents you from using it to dry additional flowers, instead when you are preserving flowers in the microwave oven, you are able to reuse the silica gel usually within the hour.
When drying flowers in the microwave do not cover the box with a lid. As you collect your dried items, store them carefully in a shallow box. They should be kept in a warm, dry place.
Flowers dried in this way can look very nearly fresh and less 'dried' than those dried by the air method. They should be handled with care. If your home is prone to a little humidity, then make sure the items are sprayed with polyurethane varnish before using them for your arrangement.
Warning! Silica gel is not toxic, but remember never use silica gel containers or dishes for preparing food after you use them for drying flowers or for drying silica gel, because they often absorbs pesticides from plants as they dry.


Cheese fondue was invented out of necessity. In the remote and isolated mountain villages in the Swiss Alps people had to rely upon locally made food. During winter, fresh food became scarce. The Swiss found that melting stale cheese made it edible. Local wines and seasonings were added and even the dry and hard bread tasted delicious after it was swirled in the creamy melted cheese.
Fondue became popular in the United States during the mid-1960s after American tourists discovered it in Switzerland.